
Everything Old Is New Again
Building a blog from scratch in 2022 using Hugo, Docker and a little bit of Python
I’ve been building the foundations for this blog over the past few weeks and it seems fitting that the very first post should cover some of my experiences. My goals for the blog were for it to be simple, fast and accessible. I wanted to build it from scratch myself using modern technologies, and I wanted it to be easy to update and manage.
My web development history reaches back to the late 90s. Those were the days where you used Macromedia Dreamweaver and handcrafted HTML to produce some visual abomination of tiled backgrounds and animated GIFs. You’d upload it using FTP to Geocities or Angelfire, join a webring or two and watch your page counter tick up. They were simpler times — Netscape Navigator and Internet Explorer were the only major browsers, HTML was limited and simple, and your site had to be lean because all your visitors were on dial up modems.
Within a decade, the world had moved on to content management systems like WordPress and Drupal. HTML had gotten more complex, and now CSS and JavaScript were staple tools for front end development. I never got comfortable enough with any of the CMS back ends to properly code a site with them. Instead, I patched together sites using others’ plugins and heavily modified themes to distinguish them from the rest of the crowd. It was unsatisfying and clunky. Content was created in the browser using terrible WYSIWYG editors, and elegant layout was hard to achieve.
This era also saw the rise of hosted platforms such as Blogger, LiveJournal, Tumblr and WordPress. It was an easy way to get your writing online. You didn’t have to know how to set up a LAMP stack, nor support the quirks of non-standards-compliant browsers. You just signed up an account and started writing. A lot of content creators began to move away from self hosted websites. Today, these have morphed into fully fledged publishing platforms like Medium or SubStack, with authors getting paid for the content they write.
At the same time as the rise of the hosted platforms, web application frameworks like Laravel, Django and Rails started to become popular. I have spent a lot of my professional career developing applications to manage, visualise and process large quantities of measurement data using these frameworks. They are fantastically powerful, but with that power also comes quite a lot of complexity. I did consider coding this blog using Rails, but it felt like massive overkill. In an experimental mood, I began investigation into what technology stacks were being used to develop self hosted blogs today.
Hugo
One recent trend for creating and maintaining personal websites is the use of static site generators. These are client run executables that ingest directories full of content written in some markup language and spit out beautifully themed static websites in HTML, CSS and JS. Behind the scenes they are highly configurable and provide sensible ways for organising content and metadata. There are a handful of static site generators out there, but I landed on Hugo after some brief research.
The things I really like:
- Just how fast it is. It builds this blog and all its assets in under a second.
- That it is fully self contained in a single executable. No big set of dependencies.
- The built in webserver that tracks changes and updates locally served pages live via websockets.
My one major frustration with Hugo is the templating DSL. I wanted to write my own theme, but the more I coded, the more annoyed I got with how limited the language was. It felt cumbersome, and I was constantly fighting to get functionality into my templates that would’ve been easy with something like ERB. Although my experience wasn’t great, I did pick up a few cool tricks while writing the theme that I’ll share below.
SVG Icon Bundles
There are two main packaging formats used for web based iconography. Font based icons are the most common, as they render consistently everywhere and require just a single HTTP request for the entire icon bundle. SVG icons are more accessible, can offer extra functionality such as animation and are generally easier to size, position and style. SVG support is now almost universal across browsers. As I discovered, it is also possible to bundle an entire SVG icon set into a single file.
The FontAwesome icon set is a well designed, easy-to-use icon set. Although it used to be distributed as a web font, they also offer their icons in standardised SVG format. Their entire set of free icons is available in the FontAwesome GitHub repository. I used Hugo to automatically generate an SVG icon bundle for the site using resource templates.
Somewhere in your theme template:
{{ $icons := resources.Get "icons.svg" | resources.ExecuteAsTemplate "bundles/icons.svg" . | minify | fingerprint }}
{{ .Scratch.Set "icon-bundle" $icons }}
And then in assets/icons.svg:
<svg xmlns="http://www.w3.org/2000/svg">
    <defs>
    {{- range resources.Match "icons/*.svg" -}}
        {{- $svg := .Content | transform.Unmarshal -}}
        {{- $name := substr .Name 6 -4 }}
        <symbol id="{{ $name }}" viewBox="{{ index $svg "-viewBox" }}">
            <title>{{ $name }}</title>
            <path d="{{ index $svg.path "-d" }}" fill="currentColor"></path>
        </symbol>
    {{- end }}
    </defs>
</svg>
These couple of code snippets generate a single fingerprinted SVG resource containing symbol definitions for all site resources matching the icons/*.svg glob. It relies on the fact that FontAwesome icons have a standard schema with a single path representing the icon.
Using the icons in the bundle is easy. Insert a regular inline SVG into the page with a <use> element that references the ID of the icon in the bundle. Within a template, the icon bundle file path can be gotten from the .Scratch “scratchpad”:
<svg class="icon"><use href="{{ (.Scratch.Get "icon-bundle").RelPermalink }}#envelope"></use></svg>
It is even simpler to insert an icon into page content using a custom shortcode. The shortcode template at shortcodes/icon.html looks like this:
<svg class="icon"><use href="{{ (.Page.Scratch.Get "icon-bundle").RelPermalink }}#{{ .Get 0 }}"></use></svg>
Within your Markdown content, you can now simply do {{< icon heart >}}.
Automatic Thumbnails and a Lightbox
Hugo themes allow overriding of the rendering of some Markdown items such as links and images. Rather than a Markdown image tag such as  being rendered as <img src="foo.png" alt="Alt Text" title="Title">, it’s possible to add some bells and whistles to the generated HTML.

An example of this can be seen to the left. If you open up developer tools and inspect the HTML tree around the image, you’ll see that the overridden rendering:
- Generates semantic
<figure>tags - Adds a caption below the image
- Automatically generates thumbnail images and a lightbox view
- Styles the image by adding classes
The Markdown code behind this figure follows the regular syntax, but (ab)uses the URI fragment of the image to encode extra settings that specify how the image is displayed. In this case, the settings specify a thumbnail size that fits in a rectangle of 300 x 300 px, and floats the figure to the left:

The template code that overrides default image rendering is located at layouts/_default/_markup/render-image.html. It starts by assuming some sensible default values (600 x 600 px thumbnail, no CSS classes and with a lightbox) and then parses the image URL and extracts settings embedded in the fragment.
{{- $url := urls.Parse .Destination -}}
{{- $class := slice -}}
{{- $size := "600x600" -}}
{{- $lightbox := true -}}
{{- range $setting := (split $url.Fragment ";") -}}
    {{- $tokens := split $setting "=" -}}
    {{- $key := index $tokens 0 -}}
    {{- $value := index $tokens 1 -}}
    {{- if eq $key "class" -}}
        {{- $class = split $value "," -}}
    {{- else if eq $key "size" -}}
        {{- $size = $value -}}
    {{- else if eq $key "lightbox" -}}
        {{- $lightbox = ne $value "false" -}}
    {{- end -}}
{{- end -}}
From there, it then grabs the actual image resource and generates a thumbnail. Sometimes, the resizing operation doesn’t significantly improve the file size, and it makes no sense to serve up separate image files for the thumbnail and lightbox. The template code checks this, and decides whether to use the thumbnail resource.
{{- $resource := .Page.Resources.GetMatch .Destination -}}
{{- if $url.Fragment -}}
    {{- $resource = .Page.Resources.GetMatch (substr .Destination 0 (sub -1 (len $url.Fragment))) -}}
{{- end -}}
{{- $thumbnail := $resource -}}
{{- $resized := $resource.Fit $size }}
{{- if le (mul (len $resized.Content) 2) (len $resource.Content) -}}
    {{- $thumbnail = $resized }}
{{- end -}}
Finally, with the settings and processed image resources, a nicely structured <figure> element is generated.
<figure{{ with $class }} class="{{ delimit . ` ` }}"{{ end }}>
    <img src="{{ $thumbnail.RelPermalink }}" alt="{{ .Text }}" style="width: {{ $resized.Width }}px; height: {{ $resized.Height }}px"{{ if $lightbox }} class="thumbnail" tabindex="-1"{{ end }}>
    {{- if $lightbox -}}
    <span class="lightbox"><img src="{{ $resource.RelPermalink }}" loading="lazy"></span>
    {{- end -}}
    {{ with .Title }}
    <figcaption>{{ . }}</figcaption>
    {{ end }}
</figure>
This ended up being a really neat way to get nice images inline with the flow of Markdown content without having to use non-standard Markdown. There are some fancier shortcodes that do image galleries which I might explore, but for now, simple is good.
Contact Form
I deviated slightly from a purely static site when it came to providing a way to contact me. The HTTP endpoint handling contact form submissions is served by a very simple webserver written in Python using aiohttp. I didn’t want to have to set up all of the Python packaging, Docker builds and associated repositories, so I coded everything in a single Python file. The resulting file was just 60 lines long and could be mounted and run directly in a container spooled up from a standard Python image.
Inline Dependency Installation
The contact form handler requires aiohttp, which is not a part of the standard library. To make sure it is available, I simply install it from within the code before I attempt to import it:
import sys
import logging
import subprocess

logging.basicConfig(format="%(levelname)s - %(message)s", level=logging.INFO)
logging.info("Installing necessary dependencies")
output = subprocess.check_output([sys.executable, "-m", "pip", "install", "aiohttp~=3.8"], stderr=subprocess.STDOUT)
logging.debug("Output from pip:\n  %s", "\n  ".join(output.decode(sys.stdout.encoding).split("\n")))
Calling pip from within the code initially seemed hackish, but ended up being an elegant solution to getting dependencies installed without having to do a custom image or package build. It has the added benefit of automatically applying updates every time the webserver is started.
Handling Requests
Requests POSTed by the contact form contain just two fields encoded as regular application/x-www-form-urlencoded content.
message— The message for me.return-to— The URL of the page the POST was made from. This is automatically populated by Hugo into a hidden form field.
To handle these POST requests, we write a simple asynchronous handler that gets the form data, puts the message in a send queue and raises an exception to redirect back to the return-to page.
from aiohttp import web

routes = web.RouteTableDef()
app = web.Application()

@routes.post("/matt/send-message")
async def send_message(request):
    data = await request.post()
    return_to = data["return-to"]
    message = data["message"]
    await app["send_queue"].put(message)
    raise web.HTTPFound(location=return_to)
Sending Messages
Sending the messages is done asynchronously to handling requests. A separate task sucks on the other end of the message queue, and fires off the message sending in an executor (in this case the default ThreadPoolExecutor). aiohttp provides facilities to start and clean up extra tasks along with the webserver, resulting in the following code:
def send(message):
    logging.info("Sending message:\n%s", message)
    # Actual message sending implementation removed for brevity

async def send_task():
    while True:
        message = await app["send_queue"].get()
        await get_running_loop().run_in_executor(None, send, message)

async def startup(app):
    app["send_queue"] = Queue(5)
    app["send_task"] = create_task(send_task())

async def cleanup(app):
    app["send_task"].cancel()
    await app["send_task"]


app.on_startup.append(startup)
app.on_cleanup.append(cleanup)
app.add_routes(routes)
web.run_app(app)
Hosting
I ended up self hosting this blog. There were plenty of attractive alternatives in the form of static hosts — Netlify and Render were two that I investigated. I also could have just dumped the static site directly into an S3 bucket. Ultimately, because of the slight dynamic requirement introduced by the contact form and the fact that I have a bare metal server sitting mostly idle in a datacenter close by, self hosting seemed to be the sensible option.
Speed was one of the primary goals when building this blog, and my dinky server wasn’t going to cut it. Unless you have access to servers across the world and the deployment and update mechanisms to support them, a content delivery network (CDN) is really the only way to guarantee low latency responses to your site visitors. There are a few to choose from, but Cloudflare offers a free tier and contributes some spectacular deep dives into technical topics over at their blog, both which make them alright in my book.
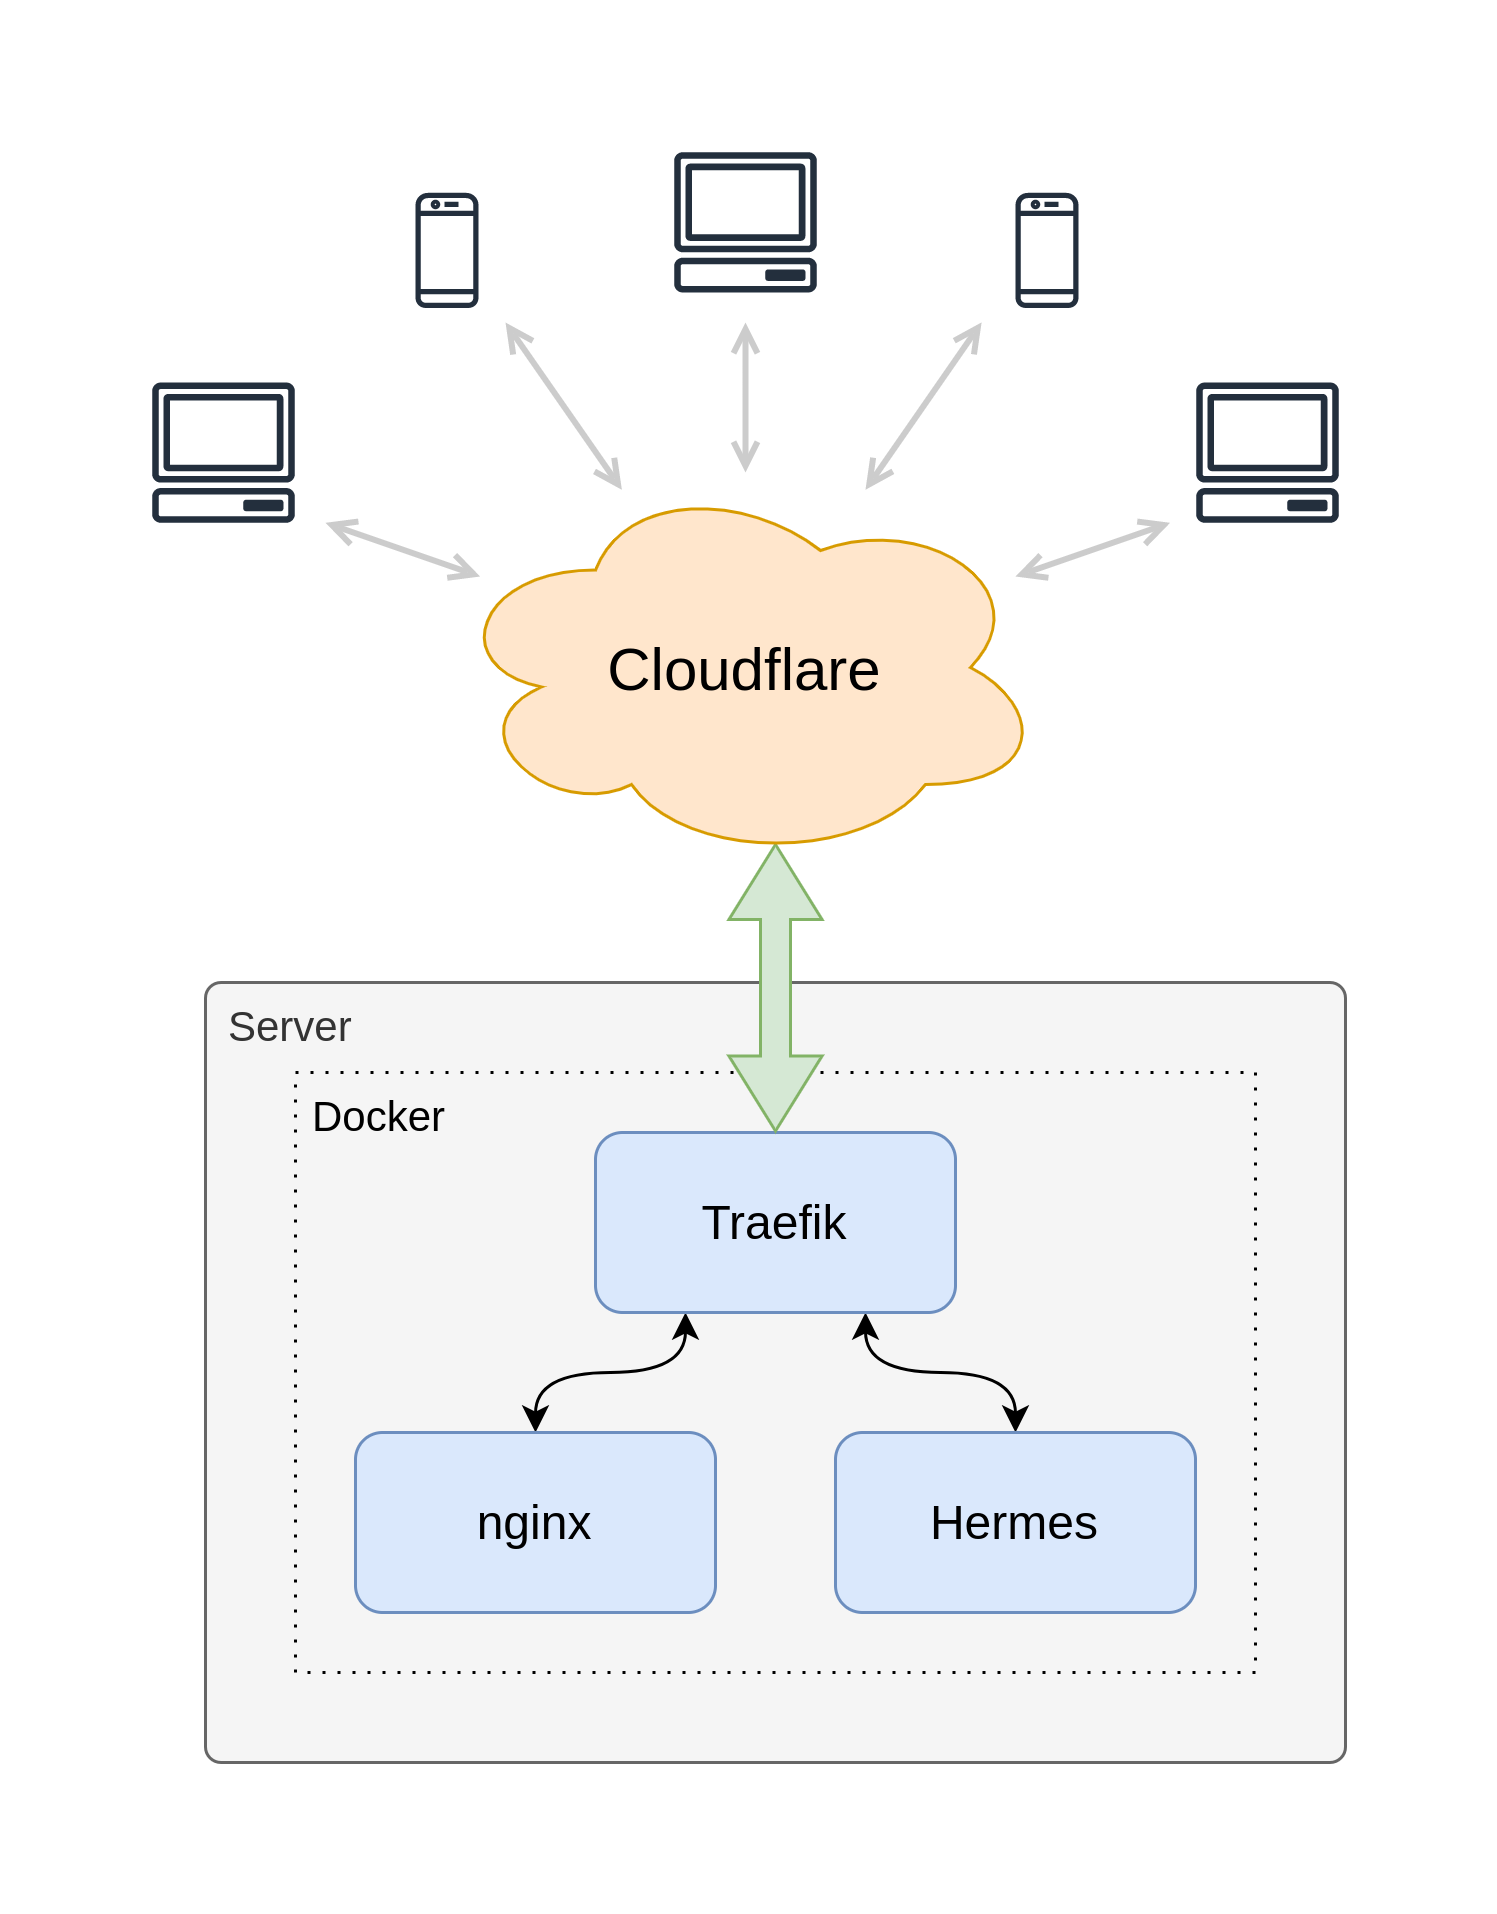
The final architecture I ended up with is shown in the image above. Traefik is used as a reverse proxy to route requests, renew Let’s Encrypt TLS certificates and authenticate clients to ensure they all come from Cloudflare. nginx is used to serve static assets. My custom Python contact form handler (which I’ve named Hermes), well, handles contact form requests. I’m a pretty big fan of containerisation, and have a lot of experience with Docker and Docker Compose, so all of this is wrapped up in a simple docker-compose.yml. The final piece of the puzzle is Cloudflare caching and handling all traffic for the blog worldwide.
Final Thoughts
After settling on Hugo, coding a custom theme, writing a quick contact form handler and configuring the blog hosting, I’ve arrived at a setup that feel uncannily like it’s 1999. The site is fast, clear and simple. I write content in a plain old text editor, and drop image files into folders to use them. Publishing is almost instant thanks to a short bash script that builds the static content, rsyncs it to my server and purges the Cloudflare cache. There is no clunky CMS to configure and manage, no big web framework to deal with and update.
All I need now is a few <marquee> tags and a guestbook.